Today, we’re diving into some simple electrical upgrades that can make a big difference in your home. Remember, safety first – if you’re not comfortable with any of these tasks, don’t hesitate to call a licensed electrician.
First, some general tips before digging in:
- Always turn off power at the circuit breaker before working on an electrical device. I recommend this Klein Tools Circuit Breaker Finder to help identify which breaker.
- Use a voltage tester to confirm the power is off before touching any wires. I use a Fluke T5-600 multimeter for this. Its small and easy to use as it automatically detects AC/DC voltage when selected.
- Take a picture of the wire configuration before disconnecting anything.
- Get yourself some WAGO 221 Lever Nut connectors. They are great alternatives to wire nuts.
1. Installing new GFCI Outlets in Wet Areas
Ground Fault Circuit Interrupter (GFCI) outlets are crucial in areas where water and electricity might mix. New versions have a small green indicator light that turns red or off when it trips or looses power.
Benefits:
- Prevents electric shocks
- Reduces risk of electrical fires
- Required by code in many areas
Where to install:
- Kitchens
- Bathrooms
- Outdoor areas
- Laundry rooms
Safety tip: Always turn off power at the circuit breaker before working on outlets.
2. Upgrading to Smart Outlets and Smart Switches
Bring your home into the 21st century with smart outlets and smart switches
Benefits:
- Control devices remotely (like turning off the light from your bed!)
- Set schedules for energy savings, Burglar deterrence
- Monitor energy usage
Installation tips:
- Ensure your Wi-Fi signal reaches the location
- Check devices if a Hub is required
- Check compatibility with your smart home system
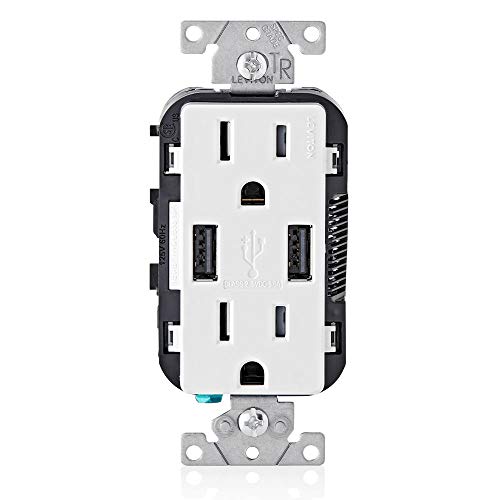
3. Adding USB Charging Ports to Existing Outlets
Say goodbye to bulky charging adapters cluttering your outlets. These can be found in USB-A and USB-C configurations, or one of both!
Benefits:
- Charge devices directly without adapters
- Free up regular outlets for other uses
- Cleaner, more organized look
Installation note: These may require a slightly deeper electrical box, so measure before purchasing.
4. Upgrading to LED Lighting
Modernize your home’s lighting for energy efficiency and longevity. I use GE’s Relax LED light bulbs for my house. They seem to work well, last a long time, don’t hum when dimmed, and turn on instantly, unlike some of the LEDs I’ve tried.
Benefits:
- Significant energy savings
- Longer lifespan compared to traditional bulbs
- Available in various color temperatures
- Often dimmable (with compatible switches)
Upgrade tips:
- Check fixture and dimmer switch compatibility before purchasing LED bulbs
- Consider color temperature for different rooms (warm for living areas, cool for workspaces). I use 3000k for the lights over the shower, and 2700k just about everywhere else in my house.
- Look for ENERGY STAR certified bulbs for best efficiency
Installation note: While simply changing bulbs is easy, updating fixtures may require basic electrical work. Always turn off the power before working on light fixtures.
5. Replace worn out outlets
Over time, electrical outlets can become loose, worn, or damaged, potentially creating safety hazards. Replacing them with tamper-resistant outlets is a straightforward upgrade that significantly improves both safety and functionality, especially in homes with young children.
Benefits:
- Enhances electrical safety for the whole family
- Childproofs your outlets, preventing insertion of foreign objects
- Improves the grip on plugs, preventing them from falling out
- Updates the look of your room
- Opportunity to add features like USB ports or smart capabilities
What are tamper-resistant outlets? Tamper-resistant outlets have built-in shutters that cover the contact openings (slots). These shutters remain closed unless a plug is inserted, preventing children from inserting objects like keys or paperclips into the outlet.
Installation tips:
- Always turn off power at the circuit breaker before working on outlets.
- Use a voltage tester to confirm the power is off before touching any wires.
- Take a picture of the wire configuration before disconnecting anything.
- Replace one outlet at a time to avoid confusion.
- Ensure the new outlet is properly grounded.
Pro tip: While replacing your outlets, consider using outlet spacers for a flush mount. These handy devices can solve the common problem of outlets being loose or sitting too deep in the wall, which can cause plugs to fall out or create gaps between the outlet and cover plate.
Benefits of outlet spacers:
- Allow furniture to sit closer to the wall
- Improve the overall appearance of your outlets
- Ensure a snug fit for plugs
- Easy to install during outlet replacement
Our recommended outlet spacers are these made by RonJea. These spacers are durable, easy to use, and stack to fit any outlet depth. They work great with tamper-resistant outlets too! (You may need extra long screws too!)
Childproofing note: While tamper-resistant outlets provide a high level of protection, they should be used in conjunction with other childproofing measures, not as a replacement for supervision.
Remember, if you’re not comfortable working with electrical wiring or if your home has aluminum wiring, it’s best to consult with a licensed electrician.
6. Replacing Old Two-Prong Outlets with Three-Prong Grounded Outlets
A must-do safety upgrade for older homes.
Benefits:
- Improved safety for modern appliances
- Reduces risk of electric shock
- Allows use of three-prong plugs
Important: Ensure the outlet box is properly grounded before installing. If not, consult an electrician.
7. Installing Motion Sensor Lights
Enhance security and convenience with motion-activated lighting.
Think of places where the light switch is inconvenient.I’ve installed them in our mudroom and in our basement laundry room as we always have our hands full and have trouble turning on the light switch.
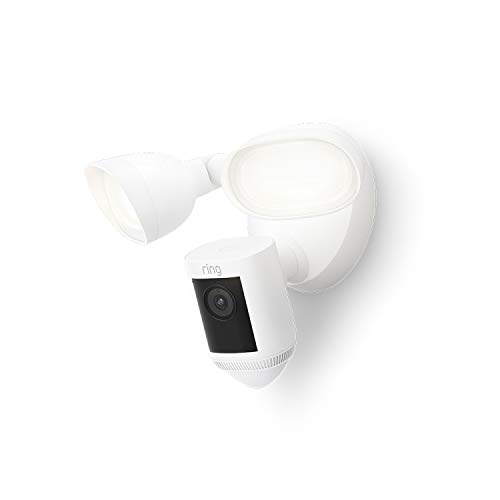
Additionally, you can replace outdoor floodlights to Ring Floodlight Cam Wired Pro’s.
Benefits:
- Improves home security
- Saves energy by only activating when needed
- Convenient for outdoor areas and hallways
Installation tip: Adjust the sensitivity and duration settings to prevent false triggers.
8. Upgrading to a Smart Thermostat
Take control of your home’s climate and energy usage. I’ve recently replaced my six mismatched “dumb” thermostats to Sensi Smart Thermostats.
Benefits:
- Program temperature schedules
- Control remotely via smartphone
- Potential for significant energy savings
- Reduced cost from your Energy provider
Compatibility check: Ensure your HVAC system is compatible with smart thermostats before purchasing. C-wires may be required.
9. Adding Whole-House Surge Protection
In our increasingly connected homes, protecting your valuable electronics and appliances from power surges is more crucial than ever. While many of us rely on power strip surge protectors, a whole-house surge protection system offers a more comprehensive safeguard for all your electrical devices.
What is a whole-house surge protector? A whole-house surge protector is a device installed directly into your home’s electrical panel. It acts as a first line of defense against external power surges, such as those caused by lightning strikes or issues with the power grid.
Benefits:
- Safeguards all electronic devices and appliances in your home
- Provides peace of mind during storms or power fluctuations
- Can potentially lower your home insurance premiums
- Protects devices that can’t be plugged into typical surge protector strips (e.g., HVAC systems, built-in appliances)
- Longer lifespan compared to plug-in surge protectors
Types of whole-house surge protectors:
- Type 1: Installed at the service drop (where power lines connect to your home). Usually installed by your utility company. (Amazon – Schnieder Type 1 Surge Protector)
- Type 2: Installed at the main electrical panel. This is the most common type for homeowner installation. (Amazon – Eaton Type 2 Surge Protector)
- Type 3: Point-of-use protectors (like power strips). These can be used in conjunction with Type 1 or 2 for layered protection. (Amazon – 6 outlet surge protector power strip)
Installation considerations:
- While this is a DIY-friendly upgrade for those comfortable with electrical work, it does involve working in your main electrical panel. If you’re not experienced with this, it’s best to hire a licensed electrician.
- Check your home’s electrical system capacity. Most whole-house surge protectors require a 240-volt, 30-amp double-pole circuit breaker.
- Look for UL 1449 listed devices for assured quality and performance.
Maintenance:
- Most whole-house surge protectors have indicator lights showing they’re functioning properly. Check these periodically.
- They typically last 3-5 years, depending on usage and the number of surges they absorb.
- Some models have replaceable modules, allowing you to extend the life of the unit without replacing the entire system.
Pro tip: For comprehensive protection, consider a layered approach: Install a whole-house surge protector at your electrical panel, and use high-quality surge protector strips for sensitive electronics like computers and entertainment systems.
Remember, while a whole-house surge protector is an excellent defense, it’s not a guarantee against all possible electrical issues. Regular electrical maintenance and being mindful of your home’s electrical load are still important practices.
10. Installing Under-Cabinet Lighting in the Kitchen
Brighten up your workspace and add ambiance to your kitchen.
Benefits:
- Improves task lighting for food prep
- Adds a modern, high-end look
- Can increase home value
Options:
- LED strips
- Puck lights
- Fluorescent tubes
Wiring tip: Consider using low-voltage or battery-powered lighting for easier DIY installation.
Remember, DIY Dads, while these upgrades can be exciting and rewarding, always prioritize safety. If you’re unsure about any step in the process, it’s best to consult with or hire a licensed electrician. Happy upgrading!


